

DISCLAIMER: If you attempt to reflash your screen's firmware, there is always a chance that something goes wrong, and that you end up with a very expensive brick. As always, I cannot be held responsible in this case.
Note: for support, please head to the Blur Busters forum topic at http://forums.blurbusters.com/viewtopic ... &t=779
Important Note: as you can see by reading the above forum topic, people have had mixed results, depending on the hardware they used. So if the update fails the first time you attempt it, don't panic, and simply retry it using a different desktop or laptop.
Update (2014-05-04): A new version of the patch is available, that removes the hardcoded path and address, and has better error messages. The article has been updated.
Update (2014-05-07): A new version of the patch is available, that adds a "noreset" option. When set, the reset command will not be sent at the end of the read/write operation. Furthermore, the reset command will also be skipped in the event an error occurred during the process. This aims to prevent bricking the screen, since the reset command seems to do more than just exit the ISP mode. Simply run flashrom in chip identification mode, without the reset option, after a successful flash, to exit the ISP mode.
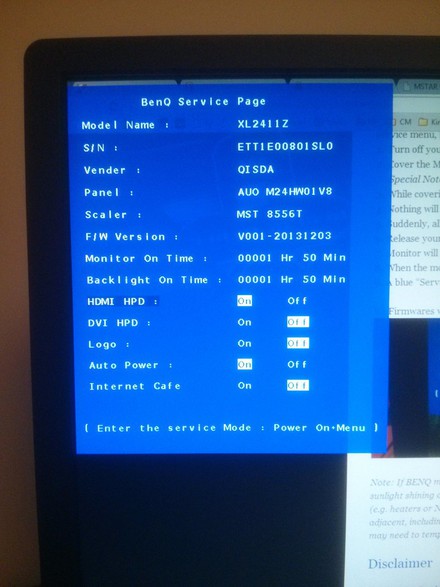
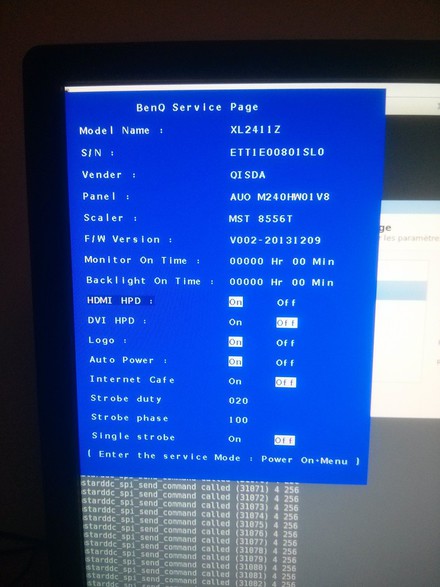
I recently bought a XL2411Z screen, but it turned out that Blur Reduction, its "key selling feature", wasn't working properly.
BenQ then released a V2 firmware, but no instruction or tool allowing to reflash the firmware. The only available options were to buy a 50$ USB flasher, or to build a parallel port one, and use some proprietary and windows-only tool by MSTAR, the company that provides the chip used in these screens.
MSTAR offers no datasheet for their products, so buying a one-time use flasher wasn't really interesting, and building yet another parallel port adapter to use a completely obscure utility wasn't really challenging (even if I had the possibility to borrow a computer with a parallel port, this isn't necessarily everyone's case nowadays).
After a dozen of hours spentgooglingduckduckgoing, during which I could only find service manuals for MSTAR-equipped TVs and screens that consisted of "plug the flasher, use our windows tool", I finally found some useful information on github, thanks to the Linux kernel being GPL: two different drivers for completely unrelated chips by MSTAR, but which seemed to use the same protocol for flashing a SPI flash through I2C: https://github.com/varunchitre15/MT6589_kernel_source/blob/master/mediatek/kernel/drivers/nfc/msr3110.c and https://github.com/Nikopol2013/canvas2-4.2.2/blob/master/mediatek/custom/common/kernel/touchpanel/msg2133_ps/msg2133_driver.c.
I then read a bit more about DDC, the I2C based protocol allowing to exchange information between screens and computers, and I guessed that since it uses I2C, and since MSTAR seem to provide a way to flash SPI flash chips through I2C for many of their products, there were good chances that the same protocol would also be exposed through the I2C bus used by DDC on my screen.
So, I decided to scan the I2C bus. I plugged the screen to my laptop using a VGA cable (so yeah, by the way, you'll need a PC or laptop running GNU/Linux, probably also a second screen (or remote shell) in the case it's a PC, since the one you'll be flashing has to be in standby mode during the operation, and the driver of your graphics card or chipset must register the DDC channel as an I2C bus to the Linux kernel. Intel and ATI hardware using the open source driver are OK, ATI proprietary driver is not as it doesn't expose I2C, I don't know about Nvidia open source or proprietary drivers), and ran the following commands:
Bingo! There were 4 I2C addresses responding. 0x37 and 0x50 are the "well known addresses" for DDC/CI and the EDID EEPROM, and as for 0x49 and 0x59, they are 7bit I2C addresses, which, when shifted for the R/W bit can also be represented as 0x92 and 0xb2, which appear in various service manuals of TV sets and monitors based on MSTAR chips (as well as in screenshots of the MSTAR ISP utility), and are described as 0x49/0x92 being the ISP (in-system programming) port, and 0x59/0xb2 being a debug port.
I then analyzed the two drivers that I mentioned earlier, and realized that the MSTAR ISP protocol is composed of 5 I2C commands (enable ISP, read/write, end r/w command, and reset) that merely encapsulate the SPI commands that can be found in the SPI flash chips' datasheets.
I then simply had to write a SPI programmer for the flashrom tool following the MSTAR I2C ISP protocol, and voilà!, moments later, I was flashing my screen's firmware.
The patch containing this SPI driver is available here: /static/benq/0001-Add-programmer-for-the-MSTAR-I2C-ISP-protocol.patch.
Also, please note that I2C works at 100kb/s, and thus, reading and writing the firmware takes a long time. Reading the 2MB takes 3 and a half minutes (and 8192 commands), and writing, which includes verifying afterwards, takes almost 10 minutes (and 32768 commands).
TL;DR:
Note: for support, please head to the Blur Busters forum topic at http://forums.blurbusters.com/viewtopic ... &t=779
Important Note: as you can see by reading the above forum topic, people have had mixed results, depending on the hardware they used. So if the update fails the first time you attempt it, don't panic, and simply retry it using a different desktop or laptop.
Update (2014-05-04): A new version of the patch is available, that removes the hardcoded path and address, and has better error messages. The article has been updated.
Update (2014-05-07): A new version of the patch is available, that adds a "noreset" option. When set, the reset command will not be sent at the end of the read/write operation. Furthermore, the reset command will also be skipped in the event an error occurred during the process. This aims to prevent bricking the screen, since the reset command seems to do more than just exit the ISP mode. Simply run flashrom in chip identification mode, without the reset option, after a successful flash, to exit the ISP mode.
I recently bought a XL2411Z screen, but it turned out that Blur Reduction, its "key selling feature", wasn't working properly.
BenQ then released a V2 firmware, but no instruction or tool allowing to reflash the firmware. The only available options were to buy a 50$ USB flasher, or to build a parallel port one, and use some proprietary and windows-only tool by MSTAR, the company that provides the chip used in these screens.
MSTAR offers no datasheet for their products, so buying a one-time use flasher wasn't really interesting, and building yet another parallel port adapter to use a completely obscure utility wasn't really challenging (even if I had the possibility to borrow a computer with a parallel port, this isn't necessarily everyone's case nowadays).
After a dozen of hours spent
I then read a bit more about DDC, the I2C based protocol allowing to exchange information between screens and computers, and I guessed that since it uses I2C, and since MSTAR seem to provide a way to flash SPI flash chips through I2C for many of their products, there were good chances that the same protocol would also be exposed through the I2C bus used by DDC on my screen.
So, I decided to scan the I2C bus. I plugged the screen to my laptop using a VGA cable (so yeah, by the way, you'll need a PC or laptop running GNU/Linux, probably also a second screen (or remote shell) in the case it's a PC, since the one you'll be flashing has to be in standby mode during the operation, and the driver of your graphics card or chipset must register the DDC channel as an I2C bus to the Linux kernel. Intel and ATI hardware using the open source driver are OK, ATI proprietary driver is not as it doesn't expose I2C, I don't know about Nvidia open source or proprietary drivers), and ran the following commands:
alex@hadaly:~$ sudo modprobe i2c-dev
alex@hadaly:~$ sudo i2cdetect -l
i2c-0	i2c       	i915 gmbus ssc                  	I2C adapter
i2c-1	i2c       	i915 gmbus vga                  	I2C adapter
i2c-2	i2c       	i915 gmbus panel                	I2C adapter
i2c-3	i2c       	i915 gmbus dpc                  	I2C adapter
i2c-4	i2c       	i915 gmbus dpb                  	I2C adapter
i2c-5	i2c       	i915 gmbus dpd                  	I2C adapter
i2c-6	i2c       	DPDDC-B                         	I2C adapter
alex@hadaly:~$ sudo i2cdetect 1
WARNING! This program can confuse your I2C bus, cause data loss and worse!
I will probe file /dev/i2c-1.
I will probe address range 0x03-0x77.
Continue? [Y/n]
     0  1  2  3  4  5  6  7  8  9  a  b  c  d  e  f
00:          -- -- -- -- -- -- -- -- -- -- -- -- --
10: -- -- -- -- -- -- -- -- -- -- -- -- -- -- -- --
20: -- -- -- -- -- -- -- -- -- -- -- -- -- -- -- --
30: -- -- -- -- -- -- -- 37 -- -- -- -- -- -- -- --
40: -- -- -- -- -- -- -- -- -- 49 -- -- -- -- -- --
50: 50 -- -- -- -- -- -- -- -- 59 -- -- -- -- -- --
60: -- -- -- -- -- -- -- -- -- -- -- -- -- -- -- --
70: -- -- -- -- -- -- -- --
Bingo! There were 4 I2C addresses responding. 0x37 and 0x50 are the "well known addresses" for DDC/CI and the EDID EEPROM, and as for 0x49 and 0x59, they are 7bit I2C addresses, which, when shifted for the R/W bit can also be represented as 0x92 and 0xb2, which appear in various service manuals of TV sets and monitors based on MSTAR chips (as well as in screenshots of the MSTAR ISP utility), and are described as 0x49/0x92 being the ISP (in-system programming) port, and 0x59/0xb2 being a debug port.
I then analyzed the two drivers that I mentioned earlier, and realized that the MSTAR ISP protocol is composed of 5 I2C commands (enable ISP, read/write, end r/w command, and reset) that merely encapsulate the SPI commands that can be found in the SPI flash chips' datasheets.
I then simply had to write a SPI programmer for the flashrom tool following the MSTAR I2C ISP protocol, and voilà!, moments later, I was flashing my screen's firmware.
;)
;)
The patch containing this SPI driver is available here: /static/benq/0001-Add-programmer-for-the-MSTAR-I2C-ISP-protocol.patch.
Also, please note that I2C works at 100kb/s, and thus, reading and writing the firmware takes a long time. Reading the 2MB takes 3 and a half minutes (and 8192 commands), and writing, which includes verifying afterwards, takes almost 10 minutes (and 32768 commands).
TL;DR:
# build
svn co svn://flashrom.org/flashrom/trunk@1846 flashrom
cd flashrom
wget -O- http://boeglin.org/static/benq/0001-Add-programmer-for-the-MSTAR-I2C-ISP-protocol.patch | patch -p1
make -j

# load i2c-dev driver
sudo modprobe i2c-dev

# list all i2c buses
sudo i2cdetect -l
# list i2c devices on bus 1
sudo i2cdetect 1
# get EDID (0x50) from bus 1
sudo i2cdump -r 0-127 1 0x50

# identify flash chip, on bus 1 (/dev/i2c-1) at address 0x49
sudo ./flashrom -p mstarddc_spi:dev=/dev/i2c-1:49

# dump current firmware
sudo ./flashrom -p mstarddc_spi:dev=/dev/i2c-1:49 -c "MX25L1605A/MX25L1606E" -r backup.bin

# extend firmware to 2MB, to match the flash chip size
tr '\000' '\377' < /dev/zero | dd of=firmware.bin bs=1k count=2k
dd if=XL2411Z_V2_20131209_8B72.BIN of=firmware.bin conv=notrunc

# write firmware
sudo ./flashrom -p mstarddc_spi:dev=/dev/i2c-1:49 -c "MX25L1605A/MX25L1606E" -w firmware.bin
;)
;)